We Tried Winter 2024's Popular Ice Chrome Manicure & It Wasn't As Chill As We Hoped
Winter 2023 has seen a host of festive nail trends, but one that has truly captured our hearts is the ice chrome manicure. Unlike the bright reds and golds we're used to seeing for holiday nail inspiration, this look is proving that pastel blue can be just right for winter time. Featuring a muted blue base, and a super glossy overlay, the frosty nail brings to mind images of ice skating rinks and snowy afternoons.
Similar to other chrome nail trends, what makes the ice chrome nails a standout is its super shiny, almost reflective sheen. It derives its "icy" name from the fact that it use a pale blue base, similar to how a snowflake or ice cube would appear in a painting.
TikTokers like Ally Rooker have been putting their own spin on the trend, with the creator dubbing their version "Elsa nails," inspired by the Disney movie "Frozen." In one video, Rooker uses a cornflower blue polish by Lights Lacquer. Although initially, the creamy, pastel tone looks more like a summer shade, once Rooker adds a layer of shimmery Frostbite polish (also by Lights Lacquer) on top, it transforms into a gorgeous, shiny wintery look.
Since we've been on the hunt for a low-effort winter manicure to work for all season, we couldn't resist trying out our own version of ice chrome nails. And so, we decided to pick up a few polishes from our local drug store to see if achieving this cool manicure was really as easy as TikTok make it look.
The manicure required two polishes and a topcoat
Per the TikTok video's instructions, we needed a solid light blue color and glittery top coat to achieve the perfect icy chrome manicure. For ours, we used products by Sally Hansen, for the simple reason that it was the only brand at Rite-Aid that was stocked with all of the supplies needed. We also wanted to be consistent with one brand in the hopes that the base coats would work well with the polishes. And since it seemed like everyone in Manhattan was doing their own holiday manicures, the selections were pretty picked over.
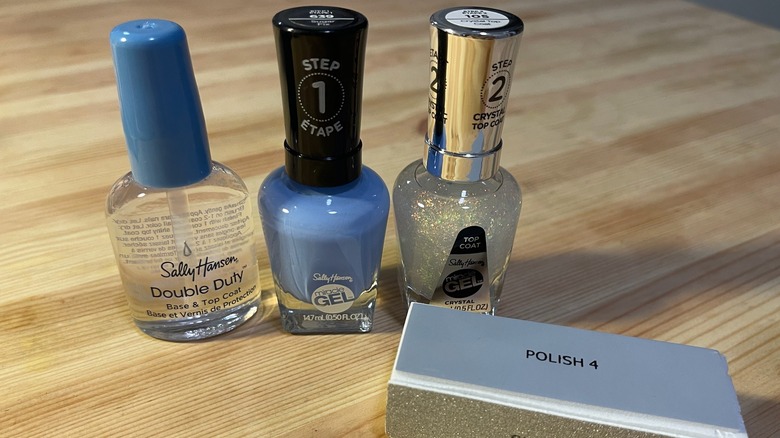
Since we've struggled before with at-home manicures chipping after a day or two, we decided to scour trusty ol' Reddit for tips from other DIY manicure enthusiasts. The Reddit page r/nails proved to be a wonderful resource, with people offering loads of advice that we applied during our process. People strongly suggested using a base coat, so we bought the Sally Hansen Double Duty Base & Top Coat for $5.99. For our pastel blue shade, we picked the Sally Hansen Miracle Gel in the color Sugar Fix, which cost $13.99. We later learned the product is actually cheaper if you order it online, but we wanted the bottle right away. We also purchased the Sally Hansen Miracle Gel Crystal Top Coat, which cost $13.99 which promised to provide a pretty, opalescent finish, and a decent top coat. People on Reddit also recommended using a buffer block to start, so we grabbed one from Ryshi.
Prepping our nails
We settled on our good old Ikea kitchen table to perform the ice chrome manicure, simply because it was the most workable countertop in our tiny apartment. In one grand swoop, we cleared away the pile of flyers and take-out menus to create a workable space.
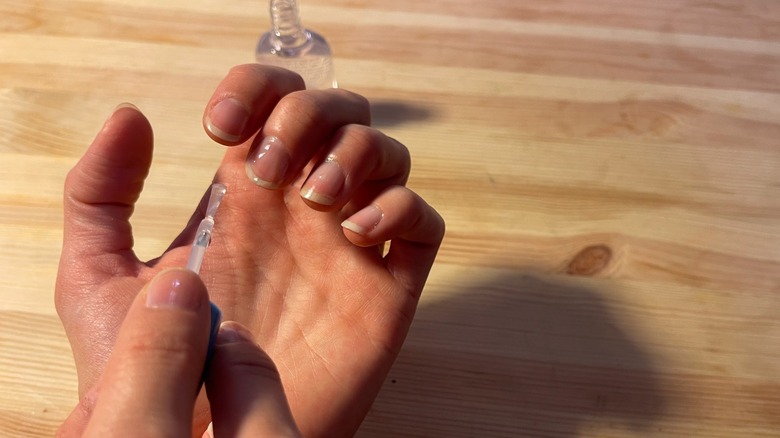
There were a few pieces of quality advice from Reddit that we heeded to make sure we got some mileage out of our manicure First, we avoided washing our hands for an hour before the manicure, as Redditors advised wet nails could change shape of the polish. Following advice from r/RedditLaqueristas, we also removed any remaining natural oils from our nail beds using a quick sweep of acetone so that the base coat and the polishes would adhere to our nail bed better. After that, we lightly buffed both the top and tips of the nails to create a smooth surface. The final prep step was to follow with a coat of the Sally Hansen Double Duty Base & Top Coat, which we let dry completely before beginning.
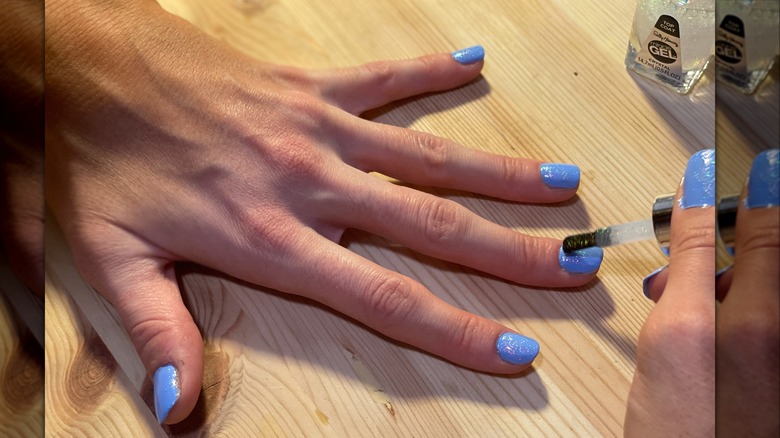
The blue coat gave us a nice, icy base
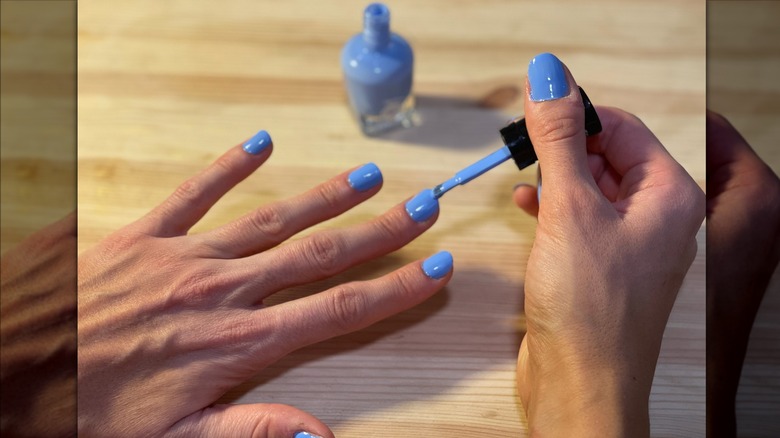
Once the base coat was dry, we applied the blue polish for the first layer of our ice chrome manicure. The Sally Hansen Miracle Gel in Sugar Fix went on a little thinner than we expected, so we followed with a second coat of the color in order to get a brighter color base.
This worked out just fine though, because the advice we got on Reddit from r/nails was to apply very thin coats of nail polish in order to avoid chipping in the long run, as opposed to one thick application of color. Of course, this didn't happen without a few nicks and bumps to the nails, but we were hopeful the top coat would disguise any flaws. After two coats, our nails looked very pretty with the pastel blue color, and we were ready to add that shimmery shade to get them looking right for the winter!
However, it was difficult to get the right level of shine
Once the blue coats of polish were dry, we went over them with the Sally Hansen Miracle Gel in Crystal Top Coat twice. To be honest, the sparkly top coat didn't give as much of a wow factor as we had hoped. Plus, it didn't look like the same top coat that Ally Rooker had in her TikTok video. We hoped that two coats would capture the sparkle, but the final, opalescent effect was pretty subdued.
Following Rooker's advice on TikTok, we then dipped our nails into an ice water bath for about five minutes to enhance the drying process. The idea was ingenious, and we're going to use this all the time going forward. Despite the effectiveness of the ice bath, the top coat still wasn't what we were looking for. It simply wasn't as transformative as we hoped it would be. On close inspection, the nails did look really pretty. They just didn't have that intense chrome factor we wanted. Part of the problem was that we were using a different product than Rooker used in her video. She used Frostbite by Lights Lacquer. Since we were using Sally Hansen's Crystal Top Coat, it makes sense that the final effect was different. Again, it wasn't bad. It just didn't have the vivid opalescence that we were seeking.
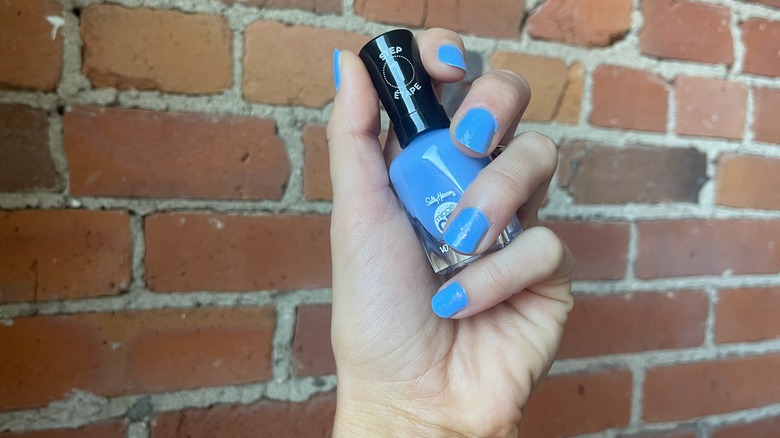
Our DIY ice chrome manicure wasn't as sparkly as expected, but it was still a nice look
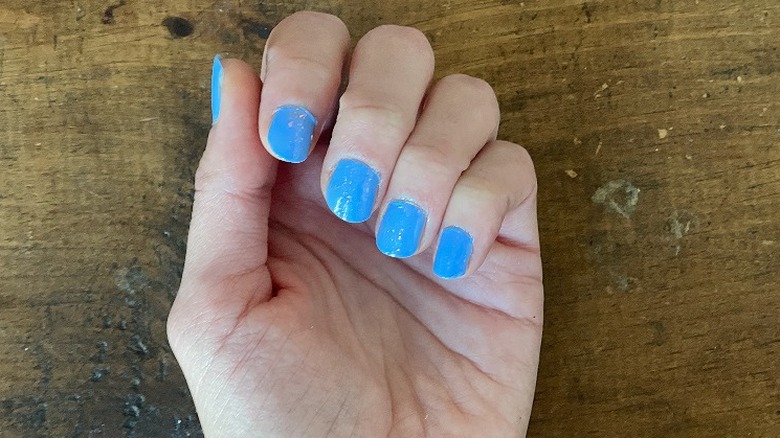
Overall, we were quite satisfied with our ice chrome manicure. The final effect was really pretty and festive. The cornflower blue tone from the first color is an unexpected choice for the winter, so the look is charming and unconventional for the holidays. The Crystal Top Coat by Sally Hansen adds the nice dimension of frostiness to the blue to give it a seasonal touch. However, in the future, we'd definitely pick a different top coat to add the opalescence. It's not that the Crystal Top Coat wasn't pretty, it just lacked the wow factor we were expecting. Next time, we would probably go to a salon to get the ultra-shiny chrome finish.
Continuing to follow all of the great advice we found on Reddit, we proceeded to be very careful with our nails following the at-home manicure. To preserve our look, we invested in dish gloves to minimize their contact with water. However, with dogs and a busy, active life, it's unlikely this manicure will last very long. But given all the effort this manicure took, we're going to try our best to preserve it as long as possible. But for the future, we'd probably limit this one for special occasions, like a holiday party.